Tuesday, April 9, 2013
BLT Pizza
Ok, I’m thinking warm thoughts here. And I’m thinking reeeeeally hard. Summer. Oh, summer.
Winter storm Walda has decided to rear her ugly head. When I went to bed last night, I could see my yard. Like, all of it. The grass was even beginning to green. We planted asparagus in our garden on Sunday. And then…
I woke up to sleet/snow pelting our windows and over an inch of the white stuff on the ground. The boys and I about got leveled this morning walking through the grocery store parking lot on our quest to get milk. And those thick, frosted sugar cookies. We definitely needed those. Garrison, my three-year-old, told me so. I’m sure you can agree with him that cookies are a necessity.
We’re expected to get 14 inches of snow. 14! It’s spring. It’s April. I’m over it.
Enter, BLT Pizza. It’s summer on a plate, and it’s delicious. And it’s perfect for telling a winter storm, who shall remain nameless from here on out, to take a hike.
You already know about my family’s love of pizza when I shared with you my Simple Pizza Dough recipe. Pizza is such a fun food, and I love that the end result is whatever you want it to be. My tastes and mood drive how much of each ingredient I put on the dough.
You can use whatever pizza dough you prefer. Slather the dough with your favorite ranch dressing. Then layer the bacon pieces and Colby jack cheese on top and bake it until bubbly and nicely browned. Pretty easy so far.
After the pizza is out of the oven, top it with chopped, leafy greens and diced tomatoes. Sprinkle on grated Parmesan cheese. Still easy, right?
Then close your eyes, take a bite, and imagine it’s 80 degrees outside. Yelling at the chaos out the window is completely optional. I might or might not be speaking from experience.
BLT Pizza
Ashley’s recipe box
Recipe for your favorite pizza dough (for a 12-14 inch pizza)
1/2 cup to 1 cup of your favorite ranch dressing
8-10 strips of bacon, cooked and in pieces
1 cup cup shredded Colby jack cheese
1 cup to 1-1/2 cups chopped lettuce
2 medium Roma tomatoes, seeds removed and diced
Grated Parmesan cheese, for sprinkling
Preheat the oven to 425F degrees. Top the pizza dough with ranch dressing. Layer bacon and cheese on top of the dressing. Bake for 12-15 minutes, until the sauce is bubbly and the cheese is slightly browned.
Remove from the oven and top with lettuce and tomatoes. Sprinkle with Parmesan cheese. Makes one 12-14 inch pizza.
Friday, April 5, 2013
Giant Symphony Cookies for Two
Here I am, posting another cookie recipe. But this isn’t just any cookie recipe. It’s a cookie recipe that makes two as-big-as-your-face cookies. Do I need to mention these cookies have chocolate? No? That’s just too obvious…after all, this is a cookie recipe shared by me. I should probably specify the type of chocolate: Symphony candy bar pieces. They are unbelievably amazing in these cookies.
Giant Symphony Cookies are fit for a celebration. But not just any celebration.
As you might know, I’m a new food blogger. I started this blog in January. You and I are still getting to know each other. Something I haven’t shared with you yet (and I can’t believe it!) is that I am a Chi Omega. That’s right. I’m Greek. And I’m proud of it. The X and the Horseshoe are my letters.
It’s because of Chi Omega that I have an obsession with owls; I think the colors Cardinal and Straw are totally meant for each other; and I believe the white carnation is one of the most beautiful flowers. Ever.
![]() |
| Bid Day 2003 (freshman year) with my pledge sisters Megan and Brianne. |
Oh yeah. And it’s because of Chi Omega that I have made the very best friends I could ask for. Women of all ages and from all walks of life. Talented, driven women. Compassionate, selfless women. Leaders, volunteers…I could really go on and on. Really. My sisters are incredible.
![]() |
| Bid Day 2004 with Amberly and Stephanie. We lived on the same dorm floor freshman year. |
Today, April 5, Chi Omega celebrates 118 years. 118 years! Since 1895, Chi Omega has been changing the lives of collegiate women for the better, providing them with leadership, service and learning opportunities, friendships that last a lifetime, and sweet memories.
![]() |
| My younger sister Courtney, who initiated in January 2006, at a country-themed date party. |
![]() |
| My Executive Board in Fall 2005. I got the privilege to serve the chapter with these inspiring women. |
One of my favorite memories was the first time I ever heard Chi Omega’s The Symphony. I was a soon-to-be college freshman at the University of Nebraska-Lincoln. I remember sitting in the living room of the Chi Omega chapter house during a formal Recruitment event. A handful of Chi Omega sisters shared, in such touching ways, why they decided to choose Chi Omega. Then, before I knew it, the lines of a poem, I determined, were being shared, with a different sister reciting each line. It was so beautiful. And I was so captivated. And I had goose bumps. At that moment, I knew that I wanted to be a part of a sisterhood that believed the words they were saying. I could feel their love for Chi Omega. I could feel their pride in Chi Omega. Chi Omega was calling me, and I was listening.
The Symphony
To live constantly above snobbery of word or deed;
to place scholarship before social obligations and character before appearances;
to be, in the best sense, democratic rather than 'exclusive',
To live constantly above snobbery of word or deed;
to place scholarship before social obligations and character before appearances;
to be, in the best sense, democratic rather than 'exclusive',
and lovable rather than 'popular';
to work earnestly, to speak kindly, to act sincerely, to choose thoughtfully that course which occasion and conscience demand;
to be womanly always; to be discouraged never;
in a word, to be loyal under any and all circumstances to my Fraternity and her highest teachings and to have her welfare ever at heart that she may be a symphony of high purpose and helpfulness in which there is no discordant note.
to work earnestly, to speak kindly, to act sincerely, to choose thoughtfully that course which occasion and conscience demand;
to be womanly always; to be discouraged never;
in a word, to be loyal under any and all circumstances to my Fraternity and her highest teachings and to have her welfare ever at heart that she may be a symphony of high purpose and helpfulness in which there is no discordant note.
Ethel Switzer Howard, Xi Chapter
1904
1904
Isn’t The Symphony beautiful? And so encouraging?
In case you were wondering, I got goose bumps just typing it.
I think it’s perfect to celebrate the 118th anniversary of Chi Omega’s Founder’s Day with a sweet treat that incorporates the Symphony candy bar. It’s only appropriate. And what’s better than a make-one-to-eat-and-a-make-one-to-share recipe? These Giant Symphony Cookies are buttery and chocolate-y. The edges are slightly crispy, but they mostly have a melt-in-your-mouth texture. So that makes them the all sorts of irresistible.
I chose to use a Symphony bar with almonds and toffee chips. I can’t resist anything with toffee, so it was a must for me. You can use the creamy milk chocolate (plain) bar. Your call. Rather than chopping up the bar, I broke the chocolate rectangles into small pieces with my hands. I worked rather quickly so I wouldn’t create a melt-y mess. Chopping chocolate can be kind of a pain because of the tiny pieces that get everywhere. But, if you would rather chop, don’t let me stop you!
The dough comes together quickly and easily. Once the dough ingredients are incorporated well, the Symphony chocolate pieces are added in, and mixed gently with a spatula. It’s the same process you follow when making chocolate chip cookies. You know what I’m sayin’.
After the dough is shaped into two very round and tall balls on a parchment-lined baking sheet, a few more Symphony pieces are strategically placed on top each. It’s like putting the bow on a present. Or the cherry on a sundae.
The cookies will spread during baking. Towards the end of baking time, you will want to watch the cookies to be sure they don’t get too crispy or brown (unless that’s how you like them). When I took these out of the oven, the edges were slightly brown, and the center was a tad soft. Perfection.
The best part about this recipe is that it makes two cookies. One of these cookies is meant to be shared. Enjoy it in the company of a good friend (over a cup of coffee, of course) or wrap it up and gift it to a sister. It’s the perfect way to celebrate a friendship!
Happy Founder’s Day, Chi Omega! 118 years strong. I’m so proud of and thankful for our sisterhood.
I am a Chi Omega.
The best part about this recipe is that it makes two cookies. One of these cookies is meant to be shared. Enjoy it in the company of a good friend (over a cup of coffee, of course) or wrap it up and gift it to a sister. It’s the perfect way to celebrate a friendship!
Happy Founder’s Day, Chi Omega! 118 years strong. I’m so proud of and thankful for our sisterhood.
![]() |
| The ladies of my pledge class on our last Bid Day in 2006. |
I am a Chi Omega.
I am the first in my family to “Go Greek.” I pledged Kappa Chapter at the University of Nebraska-Lincoln in August 2003, and I initiated in January 2004. After graduation, I moved to West Lafayette, Indiana, to attend graduate school at Purdue University. It was there, at Chi Beta Chapter, that I began advising, and I served as New Member Educator Advisor. After I graduated, my husband and I moved to Manhattan, Kansas, so he could pursue his Ph.D. at Kansas State University. At Kappa Alpha Chapter, I served as Personnel and Scholarship Advisor. Last fall after my husband’s graduation, we moved to South Dakota. I have connected with the women of Xi Theta Chapter at South Dakota State University, and I look forward to transitioning onto their advisory board in the near future. I am so grateful that I have remained involved with Chi Omega beyond my college years. I’ve had so many wonderful experiences and opportunities that I could never have imagined. I truly believe Chi Omega is for a lifetime.
If you are interested in learning more about Chi Omega, I encourage you to visit the Fraternity’s website.
Giant Symphony Cookies
Adapted from: Sally’s Baking Addiction
4 Tbsp. unsalted butter, room temperature
4 Tbsp. granulated sugar
4 Tbsp. light brown sugar
1 egg
1 tsp. pure vanilla extract
3/4 cup all-purpose flour
1 tsp. baking soda
1/4 tsp. salt
4.75 oz. (XL-size) Symphony candy bar, in pieces and divided
(I found this in my grocer’s candy aisle)
Preheat oven to 350 F degrees. Line a large baking sheet with parchment paper. Set aside.
In a small bowl, combine the flour, baking soda and salt. Mix well and set aside.
In a medium-sized bowl, mix the butter and sugars together with a spatula. Add the egg and vanilla and mix well. Pour the flour mixture into the wet ingredients. Mix to combine. With a spatula, gently fold in 12-rectangles’ worth of Symphony bar pieces.
Place the dough on the baking sheet, making two tall balls about 9 inches from each other. Use as spoon to shape the dough. With the remaining 4-rectangles’ worth of Symphony bar pieces, top the cookies.
Preheat oven to 350 F degrees. Line a large baking sheet with parchment paper. Set aside.
In a small bowl, combine the flour, baking soda and salt. Mix well and set aside.
In a medium-sized bowl, mix the butter and sugars together with a spatula. Add the egg and vanilla and mix well. Pour the flour mixture into the wet ingredients. Mix to combine. With a spatula, gently fold in 12-rectangles’ worth of Symphony bar pieces.
Place the dough on the baking sheet, making two tall balls about 9 inches from each other. Use as spoon to shape the dough. With the remaining 4-rectangles’ worth of Symphony bar pieces, top the cookies.
Bake for 15-16 minutes, until the edges are lightly browned and the rest of the cookie appears somewhat soft. Allow the cookie to cool completely before removing from the baking sheet. Makes two giant cookies.
Friday, March 22, 2013
Caramel Egg(cellent) Chocolate Thumbprint Cookies
Here’s something I’m not afraid to admit: I get giddy when Easter candy hits store shelves. Like, I squeal in delight when I see it. Even before Valentine’s Day. Easter candy is my most favorite candy. Ever.
Do I dare mention Reese’s peanut butter eggs?
How about Starburst jelly beans?
Mini eggs, anyone? The ones with the crunchy outer shell. Oh goodness.
Lindt. Gold. Bunny?
And, behold, Cadbury mini caramel eggs.
Those caramel-filled eggs are deliciousness wrapped in delicate gold foil. I can’t get over the ooey-gooey-ness of the caramel. You know. Oh, you know.
The mini eggs were just begging me to bake with them. And so I did. These Caramel Egg(cellent) Chocolate Thumbprint Cookies are one of the cutest, softest, and yummiest cookies I have ever made. And they’re easy! The hardest part is unwrapping the eggs…and maintaining enough self-control to not eat them. It took a lot for me.
The dough is very simple. When I bake, I like to use room temperature butter and eggs unless the method requires these ingredients be chilled initially. It was no different for these cookies. With room temperature butter and eggs, the dough mixed really well and evenly. So the dough maintained its shape during baking, I did chill the dough about 45 minutes after mixing. Rolling the dough into balls will warm the dough up a bit, so it’s good to have cold dough.
After rolling the dough into 1-inch balls (I used a small cookie scoop to help measure), they get rolled in sprinkles. Sprinkles! I just love the contrast of dark cookie dough and brightly-colored sprinkles. It just screams fun. A thumbprint cookie wouldn’t be a thumbprint cookie without, well, a thumbprint. After the sprinkle-covered dough balls are placed on the baking sheet, gently press the center of each ball with a thumb. Do not press so much that you touch the baking sheet with your thumb; just give them each a nice little press.
Here’s where you’ll need to plan ahead. I would suggest that the eggs are unwrapped before making the dough. The cookies only need to bake 7-9 minutes, and as soon as you pull the cookies from the oven, you’ll need to gently press an egg into each cookie. This needs to happen while the cookies are still warm, so the egg is nestled nicely into place.
Once you get the eggs into place, don’t touch them! The milk chocolate shell will become somewhat soft (but it should maintain its shape) and shiny, so you will want to give them time to set. It took not quite two hours for mine to set at room temperature.
I think these cookies would be extra-cute on an Easter dessert table or gifted in an Easter basket. Imagine the possibilities!
Caramel Egg(cellent) Chocolate Thumbprint Cookies
Adapted from: The Curvy Carrot
2/3 cup unsalted butter, room temperature
1/2 cup sugar
1/4 cup unsweetened cocoa
1/4 tsp. baking soda
1/8 tsp. salt
1 egg, room temperature
1 tsp. pure vanilla extract
1-1/4 cups all-purpose flour
1/2 to 2/3 cup sprinkles
About 20 Cadbury Mini Caramel Eggs
Preheat oven to 375 degrees. Unwrap Cadbury mini eggs and set aside.
In a large mixing bowl, beat the butter on medium speed for 30 seconds. Add sugar, cocoa, baking soda, and salt. Mix until combine, scraping the sides of the bowl as necessary. Beat in egg and vanilla until well combined. Add the flour and mix until well-incorporated. Chill the dough for 30-45 minutes.
Roll the dough into 1-inch balls. Roll balls into sprinkles to coat. Place balls 3 inches apart onto parchment-paper-lined baking sheets. Gently press a thumb into the center of each cookie to create an indentation. Bake cookies for 7-9 minutes (until edges are slightly firm). Immediately press a mini egg into each cookie’s center. Transfer to a wire rack and cool. Do not touch eggs until set, about two hours. Makes about 20 cookies.
Tuesday, March 19, 2013
Spicy Peanut Spring Vegetables and Noodles
You know what’s not fun?
A teething toddler. Oh, man. At the risk of sounding dramatic, it’s the worst. For nearly the past two months, little Kase hasn’t been his goofy-smiley self. He’s in pain, and it’s making him irritable. And clingy. And tired. And hungry.
And it’s making me irritable. And clingy. And tired. And hungry. Except the difference between Kase and me is that I actually eat when I’m hungry.
My poor husband.
It’s amazing how kids are so different. When Garrison got his 2-year molars, we had no clue. Sure, we brushed his teeth. Well, as good as you can for a small but chompy child. We just didn’t study the back of his mouth. So when the dentist shared that his molars were in, we were happy surprised.
So you can imagine our sad surprise when we realized Kase has a bad, bad case of molar teething. After ruling out double-ear infections (which he is prone to getting), we accepted this teething business. We are trying our best to power through it and find the good. Sooooo…
You know what is fun?
Finding in-season asparagus at the grocery store! I know I said we are trying our best to find the good, but I can assure you that fresh asparagus is not a stretch. I love this time of year. To me, fresh asparagus exudes spring. I am craving spring more than ever this year. With at least nine inches of snow still on the ground, I’ll take whatever I can get. I’ll take asparagus.
Spicy Peanut Spring Vegetables and Noodles is an excellent dish that incorporates fresh asparagus. It also includes other vibrant vegetables, so it’s a visually appetizing. Julienned red peppers and shaved carrots add great color. The secret to shaving carrots is using a vegetable peeler; just run the peeler over the carrot, and voila! Perfect carrot ribbons.
The spicy peanut sauce is so good. And so spicy. You might remember that I have a thing for spicy peanut sauces (and in case you don't remember, check out my Spicy Peanut Chicken Cups). If spicy sauces aren't your thing, cut back on the jalapeno. I should make a note about the sauce. It will thicken, so don’t panic if it seems liquid-y. Be patient. Let it boil. Stir it frequently. It will happen!
This post wouldn’t be complete without the obligatory jalapeno warning. I just love cooking with jalapenos. I can’t get enough of their spice! When you chop them up, wear gloves and be extra-careful. I would suggest that if you do cut them without gloves, don’t rub your eyes. Or pick your nose. At least for awhile. Ouch.
If you are trying to find any sign of spring you can, I hope buying asparagus and making Spicy Spring Vegetables and Noodles does the trick. And if you’re dealing with a teething toddler, would you like to start a support group?
Spicy Spring Vegetables and Noodles
Adapted from: Taste of Home
Spicy Peanut Sauce
1/2 cup chicken broth
2 Tbsp. soy sauce
2 Tbsp. creamy peanut butter
1 Tbsp. lime juice, freshly squeezed
2 jalapenos, seeded and chopped
1/4 tsp. brown sugar
6 oz. thin spaghetti
18 asparagus spears, cut into 1” pieces
1 red pepper, julienned
1 medium carrot, shaved
1/3 cup green onions, sliced
3 Tbsp. olive oil
Dry roasted peanuts, chopped, for garnish
In a small saucepan, combine the chicken broth, soy sauce, peanut butter, lime juice, jalapenos, and brown sugar. Bring to a boil, stirring constantly, until the sauce begins to thicken. Turn the burner off, but keep the saucepan on the burner to stay warm.
Cook spaghetti according to package directions. Meanwhile, in a large skillet, sauté asparagus and red pepper in oil for 6-8 minutes. Add carrots and green onions to the asparagus mixture; sauté for 2-3 minutes until the vegetables are crisp-tender.
Drain pasta, toss with vegetable mixture and sauce. Garnish with dry roasted peanuts, if desired. Serves 4.
Monday, March 11, 2013
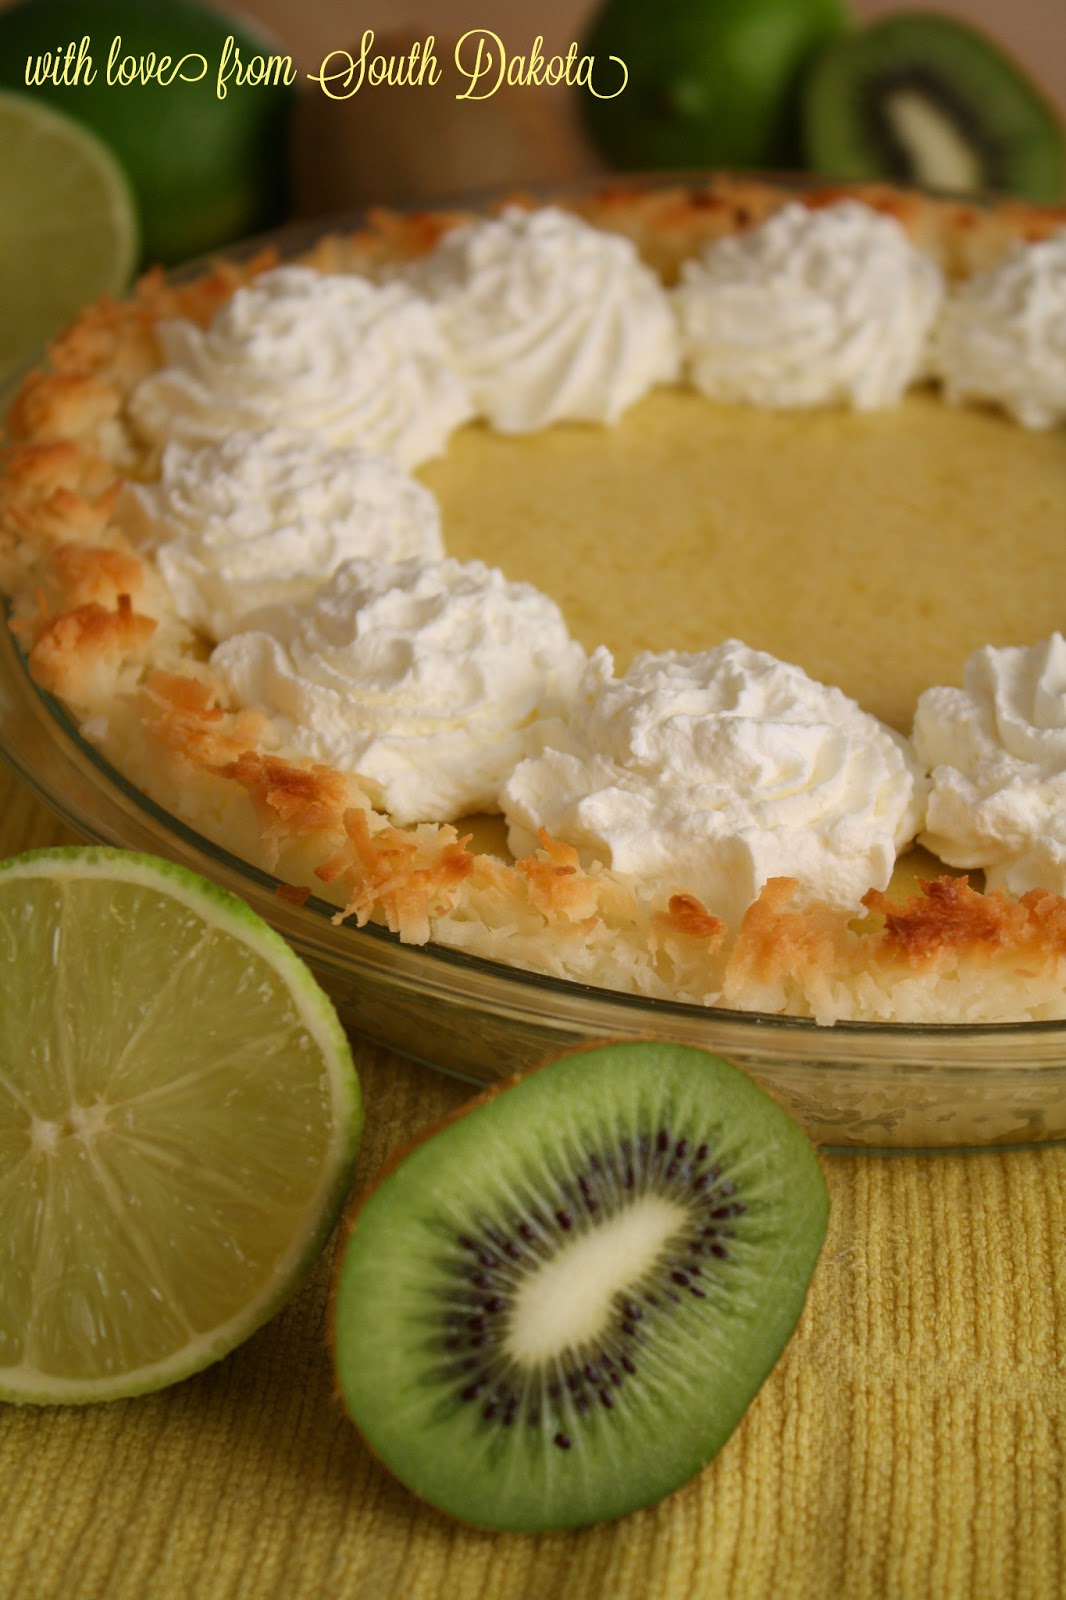
Monica Geller's Kiwi-Lime Pie with a Coconut Crust
I just love it when the culinary stars align.
You see, today is my sister Granola Courtney’s birthday. Maybe you know her? And Thursday is Pi Day (but come on, it’s really Pie Day). And Sunday is St. Patrick’s Day. So yeah, there’s a lot happening this week.
How am I going to celebrate everything?
A few weeks ago, I realized that Courtney’s birthday, Pie Day, and St. Patrick’s Day would happen within a week of each other (as it happens every year…and I just realized this?!). I wanted to make something that was so Courtney, so pie, and so green. Thankfully, those culinary stars aligned, I saw their light, and well, the rest is this pie.
There’s a story behind this pie. Of course, there’s a story.
Courtney is a Friends fan. I am a Friends fan. Ross, Chandler, Joey, Monica, Rachel, and Phoebe sure know how to make us laugh, no matter how many times we witness their crazy antics. Can they BE any funnier?
Speaking of The One with the Baby on the Bus, that episode was the inspiration for this pie. In case you aren’t a Friends fan or you don’t remember the episode, the reason Chandler and Joey are watching baby Ben is because Monica has to take Ross to the hospital for a severe allergic reaction. To her pie. Because it’s so special. Because of the kiwi.
Just watch this video clip from that episode. Not the best quality video but funny nonetheless.
Because Courtney thinks watching Friends re-runs never gets old, too, I thought it would be perfect to create a birthday dessert for her inspired by the show. Then I remembered Monica’s extra-special pie and how obvious it was to make as a way to celebrate Pie Day. And then I realized a dessert that uses green ingredients would be the perfect way to commemorate a green holiday.
So see, the culinary stars aligned.
Monica Geller’s Kiwi-Lime Pie with a Coconut Crust is all sorts of deliciousness. The layers of kiwi-lime custard, whipped cream, and coconut crust make my taste buds sing in harmony.
There is a good balance of kiwi and lime in the custard. The kiwi isn’t distinctly identifiable, but it does make this pie special. The hardest (and I type that with air quotes) is juicing the kiwi. I have found that kiwi seeds, when ground like in a smoothie, almost have a spicy, throat-burning flavor. Do you know what I mean? Or am I the only one? I didn’t want to crush the kiwi seeds for fear of that bitter-spicy taste. But I also didn’t want to include the seeds in the pie (although you totally could) because Ross had NO idea there was kiwi in the pie. Kiwi seeds would have given away the special ingredient. To juice the kiwi, I cut off the skin, and pressed the fruit gently on a mesh sieve over a measuring cup. That seemed to do the trick.
As for the custard, it’s mainly just zesting a lime, cracking eggs, and whisking. Anyone can do it. You can do it.
Let’s talk about the coconut crust for a minute. For the first 23 years—plus or minus a year—of my sister’s life, she did not knowingly eat coconut. It was one of her most hated foods. Like, seriously. And she had a lot of hated foods. When Court found out our grandma used coconut in her monster cookies, something she mentioned by complete accident because she knew of my sis’ hatred, Court refused to eat them. Recently, she discovered that coconut wasn’t as bad as she thought and instead it is quite tasty. Now that she’s over her coconut aversion, I knew I had include coconut one way or another.
The coconut crust is a wonderfully sweet complement to the tangy kiwi-lime custard. Its flaky texture adds a tropical dimension to this delicious pie. Like if you took a bite with your eyes closed, you’d feel like you were sitting on a beach somewhere far, far away from South Dakota. The thing about the crust is that you need to watch it closely. Coconut can go from nicely browned to burnt pretty quickly. A foil ring or pie shield will help prevent a disaster, especially because this crust is baked twice, without and with the custard.
Of course, there is always a place for whipped cream on pie. So whipped cream on this pie is a total no-brainer.
Could this pie BE any more delicious? No, Chandler. No it cannot.
Courtney, it is times like these that I wish the City by the Bay and The Small University Town in the Great Plains weren’t so far from each other. I’ll just have to eat a slice of pie to celebrate. And watch a birthday-themed episode of Friends. Maybe The One with Phoebe’s Birthday Dinner. Or The One Where They All Turn Thirty. All in your honor.
Monica Geller’s Kiwi-Lime Pie with a Coconut Crust
Adapted from: Martha Stewart
Adapted from: Two Tarts
Coconut Crust
2 Tbsp. butter, softened
3 cups sweetened shredded coconut
Kiwi-Lime Custard
1/4 cup kiwi juice, freshly juiced
2 Tbsp. lime juice, freshly squeezed
3 Tbsp. grated lime zest
1-3/4 cup + 2 Tbsp. sweetened condensed milk (this is 1-1/2 14-ounce cans)
5 large egg yolks, beaten
Whipped Cream
1 cup heaving whipping cream
1 Tbsp. powdered sugar (more or less to taste)
1 tsp. pure vanilla extract (more or less to taste)
Preheat oven to 350 degrees. To make the crust, combine butter and 1 cup of coconut in a food processor and process until mixture forms a balls, about 1 minute. Transfer to a medium bowl, and sprinkle the remaining coconut over mixture and mix well with hands. Press coconut mixture into the bottom of a 9-inch pie plate, leaving the edges fluffy and loose. Place a foil ring or pie shield over the crust edge to prevent burning. Place pie plate on a parchment-line baking sheet. Bake until center begins to brown, 7-10 minutes. Transfer crust to a wire rack and cool completely.
To juice the kiwi, peel the skin from the fruit. With a fine mesh sieve placed over a measuring cup, gently press the kiwi into the sieve.
To make the custard, combine kiwi juice, lime juice, lime zest, sweetened condensed milk and egg yolks in a medium bowl. Whisk until fully blended. Pour filling into the cool, prepared crust (depending on the depth of your pie plate, you may have filling remaining) and place foil ring or pie shield over the crust edge. Bake for 20-25 minutes, until set. Remove the foil ring or pie shield the last 3-5 minutes of baking to brown the edges. Transfer crust to a wire rack and cool completely.
To make the whipped cream, begin by chilling a mixing bowl and beaters or a whisk attachment by placing them in the fridge for 30 minutes or in the freezer for 10 minutes. When ready, remove bowl and beaters. Pour cream and sugar into bowl, and begin beating the cream on low speed for about 45 seconds. Increase the speed to high and continue beating until soft peaks form. Add vanilla and continue beating until incorporated. Note: I prefer to pipe whipped cream, so I beat the whipped cream until stiffer peaks form.
Serve the pie with whipped cream. If piping whipped cream onto the pie, refrigerate until serving and refrigerate leftovers in a well-sealed container. Note: I did not find that the coconut crust became soggy after refrigeration.
Makes one 9-inch pie.
Tuesday, March 5, 2013
Simple Pizza Dough
What would life be without pizza? Pretty sad. Pitiful, really.
Our weekly menu would feel empty.
Nathan and I would have to find a new Valentine’s Day dinner tradition.
And the Husker football game experience wouldn’t be the same.
You see, we have pizza every week at our house. Every year since we’ve been married, Nathan and I have celebrated Valentine’s Day with a heart-shaped pizza for dinner. And Valentino’s pizza and Memorial Stadium just go together. Trust. They do.
Oh, and I need to add the fact that we honeymooned for eight days in New York City. And we had pizza at least once a day for all eight days. But we just ate a lot of food on that trip. It was the best. We still talk about it, six years later.
Who needs a vacation? Me. Me!
I haven’t met a pizza I didn’t like. Ok, well unless it has anchovies. Surely I’m not the only one who has an anchovy aversion?
Pizza is one of those foods that allows anyone, regardless of cooking ability, to be creative in the kitchen. I’m a fan of traditional toppings like pepperoni, mushrooms, and mozzarella, but I also love unique-and-becoming-quite-popular toppings like cream cheese, cheddar cheese and bacon. And let’s talk about sauce for a minute. Red sauce, white sauce, ranch (what?!), no sauce. There are so many possibilities.
But I’m ahead of myself.
Before we can even discuss kinds of pizza, we need to get down to the basics. To where it all begins. The dough.
I’ve had my fair share of packaged pizza dough. The just-add-water kind, the just-add-toppings kind, the let-it-thaw kind (by the way, I’ve heard that Trader Joe’s has a great frozen pizza dough), and the homemade kind. While the convenience dough is truly that—convenient—homemade pizza dough, if you can swing it, is just so worth it.
I’ve been making this pizza dough for years, and it’s never failed me. The original recipe made two pizzas, so I scaled it back so there is only enough dough for one pizza. I found that we don’t need that much pizza at once. I mean, I do need that much pizza, but my skinny jeans tell me I don’t. If it’s there, I would eat it. So we pair our pizza with salad. I feel much better about myself when we do that.
I will tell you that before I started making this dough, I hadn’t cooked with yeast. I think partly because my mom never did (so that's all I knew), and I think partly because I was a bit afraid of it. I mean, it’s yeast. It’s got to have special powers to make dough rise, right? And it must be temperamental? Not to fa-reak you out, but yeast is a living organism. It needs a warm, moist place and food to grow. The science nerd in me told me I had to share that fact with you. Did you know my undergraduate degree is in food science? Food fascinates me.
I’m so glad I got over my fear. I now buy yeast by the jar. And if you fear baking with yeast, get over it. I say that with love, of course.
This dough is soft yet sturdy. It holds toppings really well, and it bakes nicely. And if you couldn’t tell, this is a thin crust pizza dough. It’s just all around awesome. I think if you try it, you’ll agree.
And stay tuned. I’ll post the recipe for that mouth-watering pizza soon. And many more in the coming weeks. Dough!
Simple Pizza Dough
Adapted from: Emeril Lagasse
1/2 cup warm (105-115 degrees F) water
3/4 Tbsp. olive oil
3/4 tsp. salt
1-1/8 tsp. active dry yeast
1-1/4 to 1-1/2 cups all-purpose flour
In a large bowl, combine water, oil, and salt. Sprinkle yeast on top, and stir well to proof. After 5 minutes, add 3/4 cup flour and mix thoroughly with a stand mixer and a paddle attachment. Add enough remaining flour, slowly, so that the dough is only slightly tacky. Lightly flour a surface and knead dough for 5 minutes, adding enough flour, as necessary, to form an elastic, smooth dough. The dough should not be tacky. Add a tablespoon of olive oil to a bowl, and transfer the dough to the bowl, turning it to coat with oil. Cover with plastic wrap and let rise in a warm, draft-free place until it has doubled in size, about 1 hour.
Preheat oven to 400 degrees. With a fist, punch the dough down gently and transfer it to a lightly floured pizza pan. Cover with plastic wrap and let rest for 15 minutes. Using hands shape the dough to the desired size, keeping the dough about 1/4-inch thick. Top with toppings. Brush crust with olive oil, if desired. Bake for 10-15 minutes, depending on toppings. Makes one 12-14-inch pizza.
Subscribe to:
Posts (Atom)